This is a short article on how to use Pound as a Reverse SSL Proxy.
Problem/Requirement:
You have a few websites in your DMZ or even on the LAN. You want them to be accessible from to the outside (Internet). Some of these websites are web based applications. You also have 1 external IP.
You want to serve all these websites from the one external IP and you want most of them to be secured via SSL (HTTPS).
On top of that you have different web servers serving the pages (e.g. Apache, IIS).
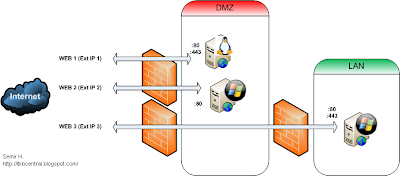
The diagram below depicts a typical inefficient web server setup (click on image to see larger version):
- Use just one external IP.
- Use one SSL certificate (for websites under the same domain/sub domains).
- Secure websites REGARDLESS of the web server technology used to serve those websites.
- Have the ability to pick which websites get SSL encryption based on the source of the request (e.g. if from Internet then use SSL, if from corporate LAN then do not encrypt).
Solution:
Use a free application called Pound.
What is Pound?
Pound is a reverse HTTP proxy, load balancer, and SSL wrapper. It proxies client HTTPS requests to HTTP backend servers, distributes the requests among several servers while keeping sessions, supports HTTP/1.1 requests even if the backend server(s) are HTTP/1.0, and sanitizes requests.
It runs on Linux.
You can find more info @
http://www.apsis.ch/pound/
How Will it Work?
The diagram below shows where we want to be (click on image to see larger version):
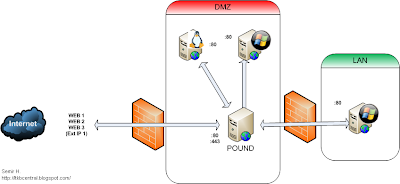
Basically we want the Pound server to be the first point of contact from the outside. This way we reduce the number of "holes" we have to open in the firewall(s) and put another layer of security between the Internet and our web servers.
Pound meets all of our previously stated requirements:
- We can use just one External IP to server all our websites.
- Using a wildcard certificate (e.g. *.testdomain.test) we can encrypt all the web sites under the same domain/sub domains with just that one cert.
- Because we are doing the SSL encryption with Pound, it no longer matters what the other web servers inside your network use to serve pages. They can be Apache, IIS, Tomcat, etc. You can leave them ALL at the default port 80 (or 8080 for some). Pound can talk to them on pretty much any available port (even 443).
- We can make pound encrypt all requests that come from the Internet but NOT do so if the requests come from the LAN. Some companies choose to do that because it makes things faster. Not using SSL/HTTPS internaly can be done in two ways. One way is through Pound (so all the internal websites would point to the same internal Pound IP) and the other way is to not involve Pound at all. People wold just directly access the individual web servers. An advantage of going via Pound is that you can track access from one location and perhaps do custom redirects when needed (e.g. if a web server is down for maintenance you can have pound redirect to a notification page somewhere else).
Of course, there is one problem with using Pound for evertynig. It becomes a single point of failure. I suppose that can be remedied by using another Pound server to load balance or in another way (e.g. run as Virtual Machine - which works good. Let VMware worry about high availability, etc)
Next we will examine how some of the above is actually implemented:
Please Note:
This tutorial will not examine how the SSL certificates are acquired. The only thing you have to make sure is that they are Linux compatible. Pound runs on Linux. I usually use a self signed cert but if you generate one via a trusted CA then use the Apache/Linux instructions.
Let's assume you want to Encrypt web access for two of your internal web servers IF the requests are from the Internet. If they are from the LAN then do not encrypt.
Domain = testdomain.test
Internal Web Srv 1 = 192.168.7.5 (DMZ)
Internal Web Srv 2 = 192.168.0.10 (LAN)
The Pound server should always be put in the DMZ. Ideally all of your "exposed" servers should be but that is sometimes not an option.
Pound Server = 192.168.7.50 (DMZ)
First we define a HTTP (port 80) listening directive. Under that we put in our two web servers and since we want to encrypt them (if the requests is from the Internet and is on port 80 (HTTP) we will redirect to HTTPS:
ListenHTTP
Address 192.168.7.50
Port    80
xHTTP   2
Service
HeadRequire "Host: .*web1.testdomain.test.*"
Redirect "https://web1.testdomain.test"
End
Service
HeadRequire "Host: .*web2.testdomain.test.*"
Redirect "https://web2.testdomain.test"
End
End
Next we define a HTTPS directive. This will be the one that will accept the redirects from above AND direct HTTPS requests (no redirect required in that case). This is also where we define which certificate to use and which back servers to contact.
ListenHTTPS
Address 192.168.7.50
Port    443
 Cert    "/path/to/cert.pem"
AddHeader "X-Forwarded-Proto: https"
HeadRemove "X-Forwarded-Proto"
Ciphers "ALL:!ADH:!EXPORT56:RC4+RSA:+HIGH:+MEDIUM:+LOW:+SSLv2:+EXP:+eNULL"
xHTTP   1

Service
HeadRequire "Host: .*web1.testdomain.test.*"
BackEnd
Address 192.168.7.5
Port 80
End
End

Service
HeadRequire "Host: .*web2.testdomain.test.*"
BackEnd
Address 192.168.0.10
Port 80
End
End
End
There is also a recommended "catch-all" deirective that goes to the end. This will be what Pound will serve if nothing above is matched. Example:
Service
BackEnd
Address 192.168.0.10
Port    80
End
Session
Type    BASIC
TTL     300
End
End
Access from the Internet:
Your external DNS will point web1 and web2 URLs to the same external IP. Your firewall (I use shorewall) will redirect traffic that comes on that IP over port 80 and 443 to the Pound server in the DMZ. Your internal DNS will point the above URLs to the DMZ IP of the Pound server (192.168.7.50).
So when the requests come from outside on HTTP they first hit the HTTP directive which just redirect to HTTPS. Internal DNS kicks in and the traffic is redirected back to Pound but this time over HTTPS (443). This is when the HTTPS directive kicks in. If you asked for web1 then request is directed internally to 192.168.7.5 over port 80 (HTTP). The answer is returned to the Pound server over port 80 (not encrypted) and then the traffic is encrypted to goioutside (from Pound to the Internet).
If the request from the outside is over HTTPS then the HTTPS directive is used straight away. Answers are returned to the Internet over HTTPS of course.
Access from the Inside:
The easy way is NOT to use pound if you don't want encryption.
If you want internal encryption then you just have to point the internal DNS to the Pound IP.
If you do not want encryption but still want to go through Pound then you need to give the Pound another internal IP (either another NIC or add an IP to the current NIC) and then create HTTP directives that forward traffic to the individual web servers. Of course, your Internal DNS will then have to point to that new Pound IP.
What happens if people have bookmarks that have HTTPS in them?
You can create HTTPS directives that redirect to HTTP. Effectivelly you do the opposite of what you did for the Internet traffic. Slightly more work but not the end of the world :)
Pound is capable of more complex setups than this and I may describe some of those in the future.


