This quick tutorial will show you how to create a new EBS volume in AWS EC2 and attach it to an existing EBS backed Linux (Ubuntu) EC2 Instance.
If you find this tutorial useful, please consider making a donation to support future work like this:
Preparation:
Please note down which Availability Zone (AZ) your existing Instance is in. You will need to create the new volume in the same AZ. Also note down the Instance identifier (starts with “i”) for easier identification later.
Please also schedule some downtime for your Instance (if it is an important one) as you’ll need to shut it off while the volume is attached and it will need to be restarted at least once for testing.
Procedure:
As an example I have an Ubuntu Instance here with 8 GB of disk space that comes with the Ubuntu EC2 AMIs.

To create a new volume to add to the Instance go to Volumes section of the Amazon EC2 portion in the AWS Management Console. Click on “Create Volume”.

Fill in the desired size of the Volume (my example is 20 GB) and make sure you pick the correct AZ (same as where the Instance you will attach this to is). Ignore the Snapshot. Click on “Yes, Create” to make the Volume.

Once it is created you should right-click on it and select “Attach Volume”.
Select the correct Instance and put in the device name. The default for the Device will usually do.
Click on “Yes, Attach” to proceed.
Example:

After a bit you should see the Volume listed at attached to your Instance. Here’s an example of the original 8 GB Volume and the new 20 GB Volume attached to the same Instance:

Now go back to your Instance and start it up. Log in and check if the new Volume can be seen. The quickest way of doing it is to execute “fdisk -l” as a privileged user. The example below shows the original 8 GB and the new 20 GB device.

Of course, the new Volume is unusable in this state so we’ll need to create a mount point for it, create a file system for it and mount it. We’ll also make sure it auto-mounts after the box is restarted in the future.
First, we’ll create a new mount point. “mkdir /newdisk”. This will create a folder “newdisk” in the root of the current system.
We’ll then run cfdisk on the /dev/xvdf device to create a usable partition. Please see the cfdisk documentation for more details. I basically create a new primary partition (called xvdf1) using all the available space.
Then, we’ll create a file system for the new partition. Let’s go with ext4. Command is “mkfs.ext4 /dev/xvdf1”. You can now mount the partition under the folder we created earlier. Command is “mount /dev/xvdf1 /newdisk/”. Please check you can write to it.
Next, we’ll make sure the new partition is auto-mounted on system start-up. We do this in the /etc/fstab file. Just add the following line (no quotes):
“/dev/xvdf1 /newdisk ext4 defaults 1 2”
Please see the fstab documentation for options. You may want to use different options for your own environment.
Save the file. Restart the system to test it. When you log back in you should see the new partition mounted in the correct folder and you should be able to write to it.
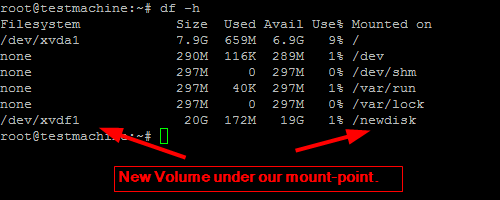
Example (df -h):
Thanks for the detailed tip
ReplyDeleteWhile attaching volume, device name = /dev/sdf sometimes doesn't work, then /dev/sdg or /dev/sdh or ... or /dev/sdp should be used.
ReplyDeleteUsually, /dev/sdf is used on Unix like os. And,
/dev/xvdf is used on Windows.
But, recently, I've noted amazon has made some changes in their device name handling on Ubuntu.